
Configure how jobs behave
Turn reusable settings into bookable services, eligible drivers, meaningful statuses, and the right proof of work at every stop.
How the settings connect
- OptionsReusable requirements such as refrigerated, wheelchair, fragile, or liftgate.
- Service typeThe bookable offering selected for the job, with planning and presentation defaults.
- WorkflowThe site's ordered states for jobs, stops, and routes.
- Stop actionsPhotos, signatures, scans, or forms created for matching stop types.
| Setting | Question it answers | Where it appears |
|---|---|---|
| Option | What capability or handling requirement matters? | Jobs, workers, vehicles, and reusable service requirements |
| Service type | What kind of work did the customer choose? | Booking, job creation, estimates, dispatch |
| Workflow | What does progress mean for this site? | Jobs, stops, routes, filters, notifications |
| Stop action config | What must the driver collect or confirm? | Matching pickup, dropoff, or waypoint stops |
1. Create reusable options
Open Settings → Options and create labels for requirements such as refrigeration, wheelchair access, fragile handling, or a liftgate. Choose whether each option can be added to workers, vehicles, service types, jobs, or a combination of them.
During automatic dispatch, the driver and assigned vehicle must have all the options the job requires. For example, the vehicle can meet an equipment requirement while the driver meets a certification requirement.
An option such as
refrigerated can be allowed on jobs, workers, and vehicles. Select it on the
job, then tag the drivers or vehicles that can actually perform it.
Pricing rules can also add a flat or percentage charge when a job carries a particular option.
2. Define the services customers can choose
Open Settings → Service Types. A service type is a bookable offering such as Standard, Express, Wheelchair Ride, or Appliance Installation.
- Name and description explain the offer to staff and customers.
- Short code is a stable identifier for CSV imports and external systems, even if the display name changes.
- Capacity describes the work's capacity requirement.
- Default service time is copied to stops that do not set their own duration and feeds ETAs and route planning.
- Image and price details help present the service in customer-facing selection.
Service types describe the work. Pricing rules decide what that work costs.
3. Choose your job, stop, and route statuses
Every site has workflows for jobs, stops, and routes. A workflow is an ordered set of states, and every state belongs to one stable phase: pending, assigned, started, completed, or cancelled. You can use labels that make sense to your team. The five groups keep dispatch, completion, filters, pricing, earnings, and notifications working correctly.
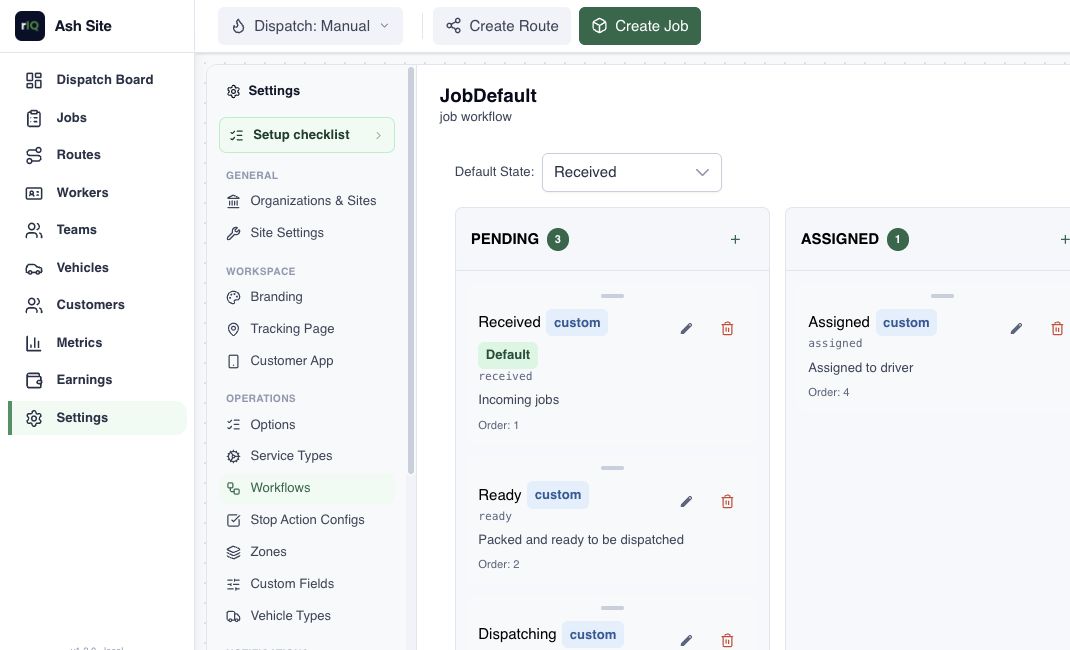
- The default state must remain in the pending phase.
- Completed and cancelled are final groups.
- A job state already referenced by job history cannot be deleted; rename it instead.
- Stop workflow states are more tightly controlled because the driver app and stop actions depend on them.
4. Require proof of work with stop actions
Open Settings → Stop Action Configs. Create one reusable task for each proof or confirmation the driver should complete. Supported actions include photos, signatures, barcode scans, and custom forms.
For each stop action, choose the stop type, when it appears, whether it is required, and where it appears in the list. New pickup, dropoff, or waypoint stops receive the active actions that match them.
Changes to a stop action apply to new stops only. They do not change the requirements already attached to existing or completed work.
Example: refrigerated delivery with proof
- Create a Refrigerated option and allow it on jobs, workers, and vehicles.
- Create a Cold Chain service type with a 15-minute default service time.
- Use job states such as Received → Ready → Assigned → In transit → Delivered, mapped to the five lifecycle phases.
- Create a required barcode scan for pickup and a required photo for dropoff.
- Select Refrigerated on the job and tag the capable drivers or vehicles. Automatic dispatch can now exclude candidates that cannot cover the requirement.
Change configuration safely
- Create or update the setting in a low-volume period.
- Create a non-production test job using the target service type and options.
- Confirm eligible drivers, copied stop actions, workflow labels, ETA, and price.
- Deactivate obsolete catalog entries when history still references them; delete only when RouteIQ Dispatch Software allows it.
Troubleshooting
No driver is eligible
Check that each driver and assigned vehicle have all the options required by the job.
A stop action is missing
Confirm the config is active, its stop type matches, and the stop was created after the config was available.
A workflow state cannot be deleted
It may be required by the lifecycle or referenced by job history. Rename it or leave it inactive where supported.